The Medieval Artefact Wanted As A Weapon of War by Recent War Mongers
On August 18, 1944, British codebreakers working at Bletchley Park intercepted an a message from Heinrich Himmler, a German Nazi politician and military leader who was also one of the main architects of the Holocaust. The message was not directly about military matters, but was reminding someone to bring the Bayeux Tapestry. Despite the dangers of travel in a country at war, the Tapestry was driven on open roads five times between 1941 and 1945, and was packed and unpacked by too many people.
Himmler (and Hitler) had been keen to get hold of the Tapestry and display it as part of their “war effort”. Despite the efforts of locals trying to frustrate the German plans, the Tapestry had already been moved from safe-keeping in Bayeux and was now in the Louvre. Himmler wanted it out of the country before Paris was blown to bits. The Germans had been trying to use it as a powerful propaganda weapon.
The Tapestry provided a visual representation of a noble lord crossing the Channel to conquer Briton. There had been teams of German “scholars” searching for evidence of Viking ancestry. The aims had been to make the Normans more Viking (and hence with stronger links to Germany) in their historic victory over the English.
In attempting to utilise the Tapestry in this manner, the Germans were merely repeating what Napoleon Bonaparte had attempted approximately 250 years earlier. Just as the Tapestry supported William’s elevation from duke to king, Napoleon Bonaparte (the Corsican Tyrant) sought to use the propaganda message of the Tapestry celebrating William the Bastard’s domination over France’s ancient enemy and neighbour.
Before Napoleon’s planned invasion by sea was eventually abandoned, the Tapestry was displayed in Paris. Napoleon gave financial incentives to theatres to support its message and in 1804 a one-act musical play was produced. After a season in Paris the play was sent on tour to towns where the awaiting invading troops were assembled.
Over 100 things you need to know about the Bayeux Tapestry
The Bayeux Tapestry: What it Is, and What it Is Not
The Bayeux Tapestry is not a tapestry at all. It is an embroidery, stitched in coloured wool yarns onto a linen ground. The term tapisserie only became common in the eighteenth century. In more accurate French usage it is the Broderie de Bayeux. The distinction matters. Embroidery allows for line, gesture, and narrative clarity in a way weaving does not, and places the work closer to manuscript illumination than to later wall hangings.
The materials are resolutely workaday: linen and wool. This apparent modesty is one reason for its survival. Precious-metal threads and jewelled textiles were routinely cut up, looted, or repurposed. The Bayeux embroidery was never worth dismantling for its raw materials.
The Bayeux Tapestry: Scale, Construction, and Technique
The embroidery measures about 68.38 metres in length and roughly 50 centimetres in height. It is made from nine separate strips of linen, sewn together edge to edge. Crucially, the embroidery runs across the seams, showing that the panels were joined before stitching began, not afterwards.
Only two stitch types are used throughout: stem stitch for outlines and laid-and-couched work for infilling. This limited repertoire is handled with great confidence. Figures read clearly at a distance, while close inspection reveals subtle variation in stitch density and tension.
At least ten colours were used, all produced from plant-based dyes such as madder, weld, and woad. Despite their age, many colours remain remarkably vivid, a testament to dye quality and controlled light exposure in later centuries.
The Bayeux Tapestry: Date, Place, and Patronage
The tapestry was made in the late eleventh century, most probably between 1067 and 1082. The strongest candidate for patron is Odo, Bishop of Bayeux, William the Conqueror’s half-brother. Odo appears three times in the narrative and is named in the inscriptions, an exceptional prominence for a cleric.
A plaque (1983) outside the Bayeux building says La Tapisserie de La Reine Mathilde as it was previously thought that William’s wife was the instigator of the work. However, inside the museum, in line with the majority of modern scholars, Odo is acknowledged as the Patron.
Stylistic, linguistic, and technical evidence strongly suggests that the embroidery was made in England, almost certainly at Canterbury, where major embroidery workshops existed and where Odo had influence. The Latin inscriptions show English spelling conventions, and the visual style closely resembles late Anglo-Saxon manuscript art.
The design presents William’s claim to the English throne as legitimate, yet it does not caricature Harold as a villain. That balance makes sense if an English workshop was executing a Norman political narrative.
The Bayeux Tapestry: Planning and Labour
The entire narrative was planned in advance. The design was almost certainly drawn onto the linen before stitching began, though the drawing itself has not survived.
Several embroiderers worked on the tapestry. Variations in stitch length, figure style, and letter forms point to multiple hands. The overall unity of the design, however, suggests a single master designer directing the work.
The workforce was probably largely female, reflecting known patterns of elite embroidery in eleventh-century England. This was professional, highly skilled labour, not amateur needlework.
The Narrative Frame
The story begins not in 1066 but in 1064, when Edward the Confessor sends Harold Godwinson to Normandy. It ends abruptly with the English fleeing after the Battle of Hastings. The final section is missing. If it ever existed, it may have shown William’s coronation on Christmas Day 1066.
The embroidery compresses time ruthlessly when it suits the argument. Edward’s burial and Harold’s coronation follow one another immediately, sharpening the political message rather than preserving strict chronology.
Harold’s Journey and Oath
Harold’s capture by Guy of Ponthieu and his release by Duke William are shown in striking detail. The oath scene is central and deliberately ambiguous. Harold is shown swearing, but the precise nature of the oath is not spelled out. This visual uncertainty mirrors the uncertainty of the written sources and allows the embroidery to assert legitimacy without overstatement.
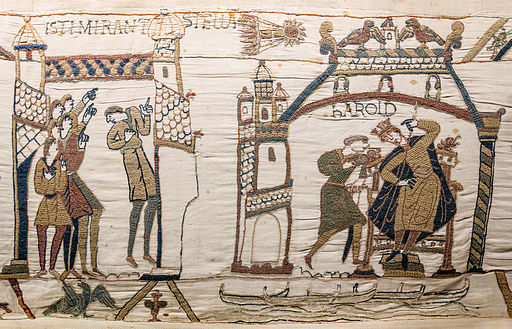
Halley’s Comet
The appearance of Halley’s Comet in 1066 is shown with figures pointing in alarm. This is the earliest known visual representation of the comet. To contemporary viewers it would have been an unmistakable sign of cosmic disorder and impending change.
Ships, Horses, Birds, and Logistics
The tapestry shows the building, loading, and sailing of William’s fleet with unusual care. Forty-one ships are depicted. Over 200 horses are shown – some of them being transported by sea, a logistical detail rarely mentioned in written sources but essential to the Norman campaign.
The trappings of falconry are shown in great detail.
This is one of the tapestry’s great historical strengths. It shows how conquest actually happened, not just who won.
The Battle of Hastings
Nearly a third of the entire embroidery is devoted to the battle. The fighting is dense, repetitive, and exhausting, by design. Horses charge, fall, and trample bodies. Infantry formations clash and collapse.
Violence is shown without sentimentality. Severed limbs, pierced torsos, and stripped corpses appear throughout. Looting is implicit. There is no heroic sanitising of death.
The Death of Harold
Scene 57 bears the inscription HIC HAROLD REX INTERFECTUS EST (“Here King Harold is slain”). Beneath it, one figure grasps an arrow near his head while another nearby (possibly Harold) is cut down.
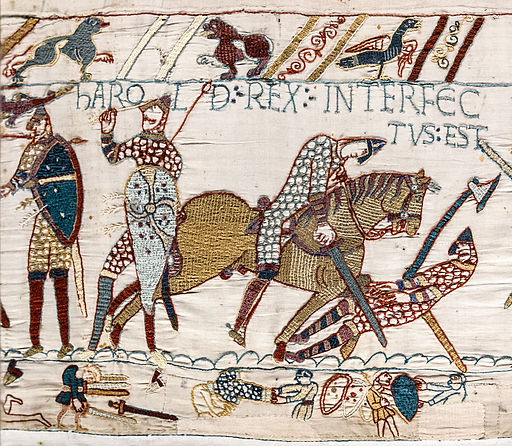
The famous “arrow in the eye” interpretation is traditional but not certain. Contemporary written accounts do not specify such a wound. The embroidery itself seems intentionally ambiguous (is the man being slain in front of the horse Harold), perhaps combining different stories or avoiding a single definitive version.
Borders as Commentary
The upper and lower borders are not decorative filler. They contain animals, hybrids, agricultural scenes, sexual imagery, and episodes drawn from Aesop’s fables.
Early in the narrative, the borders are busy and playful. As the battle begins, they fill with corpses and broken bodies. Animals and fables disappear. The visual world tightens as chaos takes over.
This is sophisticated narrative control, not naïve ornament.
Bodies, Sex, and Discomfort
Human and animal genitalia are shown openly. By modern counts, there are 93 or possibly 94 penises. Sexual imagery appears most frequently near scenes of violence, suggesting deliberate commentary rather than crude humour.
These details disturbed eighteenth- and nineteenth-century viewers. Some Victorian copies softened or omitted them. Their presence in the original tells us much about medieval comfort with the exposed body.
Visual Codes of Identity
The embroidery distinguishes English from Normans through consistent visual shorthand:
- Long hair and moustaches indicate English figures.
- Shaved necks and clean upper lips mark Normans.
In the chaos of battle, these cues allow viewers to follow the narrative quickly and accurately.
Also the English ride to battle but dismount to fight. The French use their horses as a weapon and carry out cavalry charges.
Women in the tapestry
Only three women appear in the main register (over 600 men), with two more women in the borders. Their rarity is striking and reinforces the overwhelmingly martial, masculine focus of the narrative.
Ælfgyva and the Cleric
If you want a topic for a Ph.D. thesis you might consider the meaning of this pair, but be warned, thousands (if not millions) of words have already been written about them. The panel appears to show a cleric touching or possibly striking a woman’s face. No one knows the significance of this scene or the caption above it: ubi unus clericus et Ælfgyva (“where [or in which] a certain cleric and Ælfgyva”).
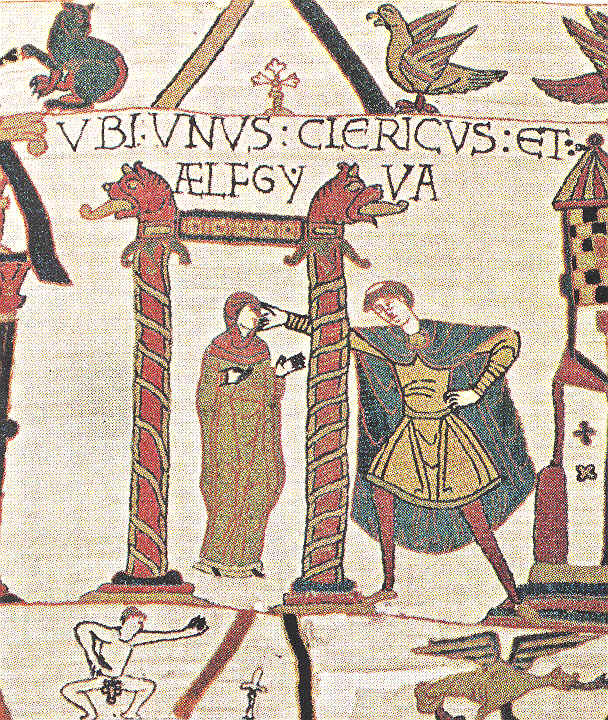
There are two naked male figures in the border below this figure; the one directly below the figure is in a pose mirroring that of the cleric, squatting and displaying his genitalia (a scene that was frequently censored in historical reproductions). Who they are and what they are doing depends entirely on which of the many, many theories you believe.
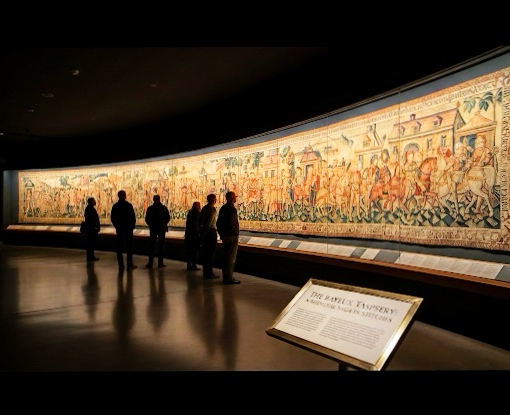
Display
The tapestry was almost certainly intended for temporary display, not permanent hanging. It was probably shown annually in Bayeux Cathedral, traditionally during the Feast of St John the Baptist.
In the fifteenth century it was hung in the nave, among the more modest hangings, not in the choir with the richest textiles. It was always important, but never treated as sacred in itself.
During the French Revolution it came closest to destruction. In 1792 it was requisitioned to cover military wagons. M. Lambert Léonard-Leforestier, a local police commissioner, retrieved it and stored it in his office. His portrait still hangs in Bayeux in gratitude.
In the summer of 1870 during the Franco-Prussian War the invading German Troops came close to Bayeux and the Tapestry was taken from its display case and soldered into a zinc cylinder.
In the C19th it was stored on a spindle in the town hall of Bayeux where visitors could unroll it (and cut pieces off).
Napoleon and Propaganda
In 1803 Napoleon ordered the tapestry to Paris as propaganda for his planned invasion of England. Critics mocked its “primitive” style and obscenity, yet Napoleon understood its power as a visual argument for conquest.
A one-act musical play, La Tapisserie de la Reine Mathilde, played in Paris and then toured French towns where invasion troops were stationed. The authors (Jean Baptist Radet, François Desfontaines, and Pierre-Yves Barré), each received 4,000 francs and bonuses. The embroidery had become state theatre.
Misunderstanding and Mockery
Not all later viewers admired it. Dickens thought it the work of “feeble amateurs”. John Constable compared it unfavourably to ancient Mexican painting. Such remarks tell us more about nineteenth-century taste than about eleventh-century skill.
Recording, Copying, and Damage
Bernard de Montfaucon’s engravings of the 1730s were the first full visual record.
Charles Stothard’s drawings of 1816 revealed holes and stains already present. Stothard used hot wax to provide ‘negative’ moulds onto which plaster of Paris was poured. Stothard also cut off and kept two fragments, probably with his wife Eliza’s involvement. Scholarship and vandalism were sometimes uncomfortably close.
Between 1885 and 1886 Elizabeth Wardle and around 37 women in Leek produced a full-size embroidered copy. William Morris advised on technique. Some explicit details were bowlderised to suit Victorian sensibilities. Ironically, this replica (stored in the Reading Museum since 1895), now preserves details that have since faded in the original, making it a document in its own right.
War and Modern Conservation
The tapestry was evacuated during both World Wars. During the Second World War it was driven on open roads five times, packed and unpacked repeatedly.
Himmler wanted it taken to Germany as evidence of supposed Viking, and therefore “Germanic”, Norman origins. An SS attempt to seize it in 1944 failed.
Since 1983 it has been displayed in Bayeux under strict environmental control. It was removed again in 2025 for museum redevelopment and is currently in controlled storage.
Meaning and Status Today
The Bayeux Tapestry is both historical narrative and political argument. It is not a neutral record, but a crafted interpretation designed to persuade.
It remains one of the most important visual sources for eleventh-century warfare, ships, clothing, and power. Its survival is not miraculous, but the result of repeated, often local, acts of restraint and rescue.
Footnote
30 January 2026 The Telegraph reported that French officials responsible for the Tapestry were mounting a legal challenge against the decision to send it on loan to Britain for an exhibition, on the grounds that travelling on roads pitted with potholes would likely damage it.
Appendix 1
Principal Scenes Checklist
Key facts
Length: ~68–70 metres; Height: ~50 cm; Divided into: c. 58 numbered scenes with Latin captions.
How to use this checklist
Each entry gives: Scene number and Latin caption (where applicable); short, focused explanation of what the scene shows and why it matters; suggested image reference to look up in museum or replica collections (use the scene number and the Musée de la Tapisserie de Bayeux or the Reading Museum replica for high‑resolution images).
- Scene 1 EDWARD REX — Edward the Confessor introduced as king; establishes the political context and the royal court. Image reference: Scene 1, Bayeux Tapestry. wikimedia.org
- Scenes 1–3 UBI HAROLD DUX ANGLORUM — Harold and his retinue ride to Bosham Church; shows Harold’s status and the English aristocratic milieu. Image reference: Scenes 1–3. wikimedia.org
- Scene 4 HIC HAROLD MARE NAVIGAVIT — Harold sets sail; introduces the voyage motif and maritime logistics. Image reference: Scene 4. wikimedia.org
- Scene 5 ET VELIS VENTO PLENIS — Ship travel with full sails; useful for studying 11th‑century ship types. Image reference: Scene 5. wikimedia.org
- Scene 6 HAROLD — Harold lands in Ponthieu; narrative pivot where he is captured by Count Guy. Image reference: Scene 6. wikimedia.org
- Scene 7 HIC APPREHENDIT WIDO HAROLDU — Harold seized by Guy of Ponthieu; shows capture and local power dynamics. Image reference: Scene 7. wikimedia.org
- Scene 8 ET DUXIT EUM AD BELREM — Harold taken to Beaurain; emphasizes movement of prisoners and diplomacy. Image reference: Scene 8. wikimedia.org
- Scene 9 UBI HAROLD ⁊ WIDO PARABOLANT — Harold and Guy confer; a moment of negotiation and status display. Image reference: Scene 9. wikimedia.org
- Scene 10 NUNTII WILLELMI DUCIS VENERUNT AD WIDONE — Messengers from William arrive; shows communication networks. Image reference: Scene 10. wikimedia.org
- Scene 11 NUNTII WILLELMI — Further messenger scenes; underlines William’s reach and authority. Image reference: Scene 11. wikimedia.org
- Scene 12 HIC VENIT NUNTIUS AD WILGELMUM DUCEM — Messenger to William; sets up Harold’s transfer to Norman custody. Image reference: Scene 12. wikimedia.org
- Scene 13 HIC WIDO ADDUXIT HAROLDUM AD WILGELMUM — Guy delivers Harold to William; a ceremonial handover. Image reference: Scene 13. wikimedia.org
- Scene 14 HIC DUX WILGELMUS CUM HAROLDO VENIT AD PALATIUM SUUM — Harold brought to William’s palace; courtly encounter and hospitality. Image reference: Scene 14. wikimedia.org
- Scene 15 UBI UNUS CLERICUS ET ÆLFGYVA — A cleric and Ælfgifu appear; debated identification (possible English noblewoman). Image reference: Scene 15. wikimedia.org
- Scene 16 HIC WILLELMUS DUX ET EXERCITUS EIUS VENERUNT AD MONTE MICHAELIS — William and his army at Mont Saint‑Michel; shows military movement and pilgrimage sites. Image reference: Scene 16. wikimedia.org
- Scene 17 ET HIC TRANSIERUNT FLUMEN COSNONIS — Crossing the Couesnon; landscape and campaign logistics. Image reference: Scene 17. wikimedia.org
- Scene 18 HIC HAROLD DUX TRAHEBAT EOS DE ARENA — Harold helps pull ships from sand; heroic service motif strengthening his bond with William. Image reference: Scene 18. wikimedia.org
- Scene 19 ET VENERUNT AD DOL ET CONAN FUGA VERTIT — Campaign against Conan of Brittany; shows Norman military action and local resistance. Image reference: Scene 19. wikimedia.org
- Scene 20 HIC MILITES WILLELMI DUCIS PUGNANT CONTRA DINANTES — Fighting at Dinan; capture and surrender scenes. Image reference: Scene 20. wikimedia.org
- Scene 21 ET CONAN CLAVES PORREXIT — Conan surrenders keys; symbolic transfer of control. Image reference: Scene 21. wikimedia.org
- Scene 22 HIC WILLELMUS DEDIT ARMA HAROLDO — William gives arms to Harold; a key scene used to argue for Harold’s oath and fealty. Image reference: Scene 22. wikimedia.org
- Scene 23 HIC WILLELMUS VENIT BAGIAS — William comes to Bayeux; local civic context and Norman consolidation. Image reference: Scene 23. wikimedia.org
- Scene 24 UBI HAROLD SACRAMENTUM FECIT WILLELMO DUCI — Harold swears an oath to William on holy relics; central to debates about Harold’s promise. Image reference: Scene 24. wikimedia.org
- Scene 25 HIC HAROLD DUX REVERSUS EST AD ANGLICAM TERRAM — Harold returns to England; transition back to English politics. Image reference: Scene 25. wikimedia.org
- Scene 26 ET VENIT AD EDWARDUM REGEM — Harold visits King Edward; courtly consultation and succession context. Image reference: Scene 26. wikimedia.org
- Scene 27 HIC PORTATUR CORPUS EADWARDI REGIS AD ECCLESIAM SANCTI PETRI — Edward’s body carried to St Peter’s; death and funeral rites. Image reference: Scene 27. wikimedia.org
- Scene 28 HIC EADWARDUS REX IN LECTO ALLOQUITUR FIDELES — Edward on his deathbed addressing followers; sets up succession crisis. Image reference: Scene 28. wikimedia.org
- Scene 29 ET HIC DEFUNCTUS EST — Edward dies; immediate political vacuum. Image reference: Scene 29. wikimedia.org
- Scene 30 HIC DEDERUNT HAROLDO CORONAM REGIS — Harold receives the crown; coronation and contested legitimacy. Image reference: Scene 30. wikimedia.org
- Scene 31 HIC RESIDET HAROLD REX ANGLORUM — Harold seated as king; depiction of royal authority. Image reference: Scene 31. wikimedia.org
- Scene 32 STIGANT ARCHIEPISCOPUS — Archbishop Stigand appears; ecclesiastical politics and contested clerical roles. Image reference: Scene 32. wikimedia.org
- Scene 33 ISTI MIRANTUR STELLAM — People marvel at Halley’s Comet; omen motif and public reaction. Image reference: Scene 33. wikimedia.org
- Scene 34 HAROLD — Harold again depicted in royal context; continuity of narrative focus on his person. Image reference: Scene 34. wikimedia.org
- Scene 35 HIC NAVIS ANGLICA VENIT IN TERRAM WILLELMI — English ships arrive in Normandy; news and reconnaissance scenes. Image reference: Scene 35. wikimedia.org
- Scene 36 HIC NUNTII AD WILLELMUM DUCEM VENERUNT — Messengers inform William of events in England; intelligence and decision making. Image reference: Scene 36. wikimedia.org
- Scene 37 HIC WILLELMUS DUX CONVOCAT MILITES SUOS — William summons his men; mustering for invasion. Image reference: Scene 37. wikimedia.org
- Scene 38 HIC WILLELMUS DUX NAVES FACIT — Shipbuilding and preparation; logistics of the Norman fleet. Image reference: Scene 38. wikimedia.org
- Scene 39 HIC NAVES AD MARITIM VENIUNT — Ships gather at the coast; staging for crossing the Channel. Image reference: Scene 39. wikimedia.org
- Scene 40 HIC WILLELMUS DUX NAVES SUAS DUCIT — William leads his ships; leadership and embarkation imagery. Image reference: Scene 40. wikimedia.org
- Scene 41 HIC NAVES AD ANGLIAM VENIUNT — Norman fleet arrives in England; invasion landfall. Image reference: Scene 41. wikimedia.org
- Scene 42 HIC WILLELMUS DUX VENIT AD PEVENESI — William lands at Pevensey; establishment of a beachhead and fortification. Image reference: Scene 42. wikimedia.org
- Scene 43 HIC MILITES WILLELMI DUCIS MUNITIONES FACIUNT — Building of motte‑and‑bailey and fortifications; Norman military engineering. Image reference: Scene 43. wikimedia.org
- Scene 44 HIC WILLELMUS DUX PUGNAT CONTRA ANGLICOS — Skirmishes and raids around the landing; local resistance. Image reference: Scene 44. wikimedia.org
- Scene 45 HIC HAROLD DUX VENIT AD WILLELMUM — Harold’s march north to meet other threats; strategic movements in England. Image reference: Scene 45. wikimedia.org
- Scene 46 HIC HAROLD DUX PUGNAT CONTRA NORWEGICOS — Harold fights Harald Hardrada at Stamford Bridge (northern campaign); shows England’s double threat in 1066. Image reference: Scene 46. wikimedia.org
- Scene 47 HIC HAROLD DUX VINCIT — Harold’s victory in the north; temporary triumph before Hastings. Image reference: Scene 47. wikimedia.org
- Scene 48 HIC HAROLD DUX REDUCIT MILITES SUOS AD SUD — Harold marches south with exhausted troops; explains weakened English position at Hastings. Image reference: Scene 48. wikimedia.org
- Scene 49 HIC WILLELMUS DUX PUGNAT CONTRA HAROLDUM — The Battle of Hastings sequence begins; large‑scale combat imagery. Image reference: Scene 49. wikimedia.org
- Scene 50 HIC MILITES WILLELMI DUCIS PUGNANT — Norman attacks and cavalry charges; depiction of tactics. Image reference: Scene 50. wikimedia.org
- Scene 51 HIC HAROLD DUX CADIT — Harold falls (iconography varies: arrow, sword); pivotal moment of the battle narrative. Image reference: Scene 51. wikimedia.org
- Scene 52 HIC MILITES ANGLORUM CADUNT — English casualties and collapse of the shield‑wall; aftermath of combat. Image reference: Scene 52. wikimedia.org
- Scene 53 HIC WILLELMUS DUX VINCIT — Norman victory asserted; William’s triumphal imagery. Image reference: Scene 53. wikimedia.org
- Scene 54 HIC WILLELMUS DUX CORONATUR — Scenes suggesting consolidation and recognition of William’s rule (interpretations vary). Image reference: Scene 54. wikimedia.org
- Scene 55 HIC MILITES WILLELMI DUCIS PUGNANT AD CASTRA — Post‑battle actions, securing camps and territory. Image reference: Scene 55. wikimedia.org
- Scene 56 HIC HOMINES ADORANT — Submission scenes and homage gestures; visual rhetoric of legitimacy. Image reference: Scene 56. wikimedia.org
- Scene 57 HIC WILLELMUS DUX REGNUM TENET — William’s control asserted across regions; programmatic closure. Image reference: Scene 57. wikimedia.org
- Scene 58 FINAL VIGNETTES AND BORDERS — Closing vignettes and rich marginalia; borders contain comic, monstrous and everyday scenes that comment on the main narrative. Image reference: Scene 58 and border panels. wikimedia… +1
© James Rye 2026
Book a Guided Tour with a Trained and Qualified King’s Lynn Guide
Sources
- Hicks, C. (2006), The Bayeux Tapestry: The Life of Story of a Masterpiece, Chatto & Windus
- Morris, M. (2012), The Norman Conquest: The Battle of Hastings and the Fall of Anglo-Saxon England, Penguin